Jewelery Box
by: modgrain
Last week I set out out design and build a small jewelry box for a Mothers Day gift. This project has a hard finish date! And, on top of that, my plan was to have my daughter Sophia help in the shop. I’ve decided to provide some insight to my thinking for this project below. For obvious reasons, I’ll post photos next week.
1. Design
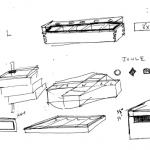
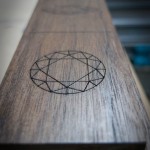
What materials, what size, budget, the details. I pulled out my sketch book and began to consider a few design options. I knew that I wanted to use my new Incra Jig Ultra. Maybe integrate box joints? Before going too far, I cut a few practice strips of .5 inch plywood…. and tested the jig out. Not an easy task to make good joints out of plywood. Maybe someday, I’ll get it working… but, for now it was obvious that I needed to use harder wood to avoid split out amongst other issues. I quickly settled on .5 inch walnut. With that taken care of, I turned back to the sketch book. Made some initial sketches…. then opened up Google Sketchup and drew up a more detailed look. I love Sketchup, but it doesn’t come without some frustration. I just need more experience and I’m sure it’s so much easier to use than it seems right now. After seeing the final sketch, the box was looking good, but it needed something more unique to make it stand out from other designs. I considered inlay and other techniques for the top, but decided that this is a perfect opportunity to laser engrave a graphic design into the top of the box. I came up with the idea to put line work of various diamond cuts. I designed those and began to build this thing!
2. Build
A couple days later… and a trip or two to Rockler to pick up wood and felt, I got started cutting out the pieces. Obviously couldn’t have my 4 year old in the shop for some of this, but I made little projects for her to help out… we played with hammers and nails, put the ear protection, shop glasses and dust mask on and off etc. I planned to have her help more later in the process (sanding and finishing). The ends of the box are approximately 2.5 wide which made is extra hard to cut the box joints on the router. Several discarded pieces of walnut prove this! Finally, I got everything cut out and dry fit. I glued it up and and sanded the top so that I could take it to Metrix Create Space to have them laser engrave the top. It turned out great. I enlisted Sophia to help me out with sanding and she loved playing with the air compressor blower. All in all, we spent another hour together fiddling around in the shop. And, she’s super excited to wrap this up and give to mom.
3. Finish
I love the raw walnut, but decided to make it several shades darker by mixing 50/50 with dark walnut stain and thinner. The last thing to do is to put a few coats of low VOC finish on it. I’m going to try out this product from ecohaus (vermont natural). I have heard good things about it. I’ll let you know!
That about covers it. Photos will be posted next week!
-
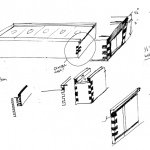
- Jewelry Box Design
-
- Preliminary Box Plans
-
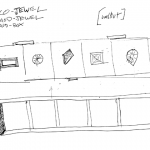
- Laser Engraving Design
-
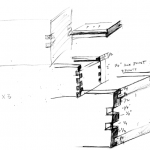
- Box Joint Planning
-
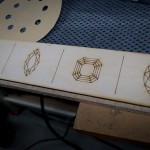
- Lid Prototype Laser Cut
-
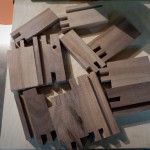
- Box Joint Prototyping
-
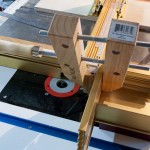
- Incra Jig Ultra Setup
-
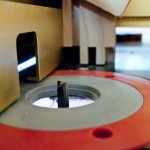
- Incra Jig Ultra
-

- Incra Jig Ultra Detail
-
- Lid detail
-
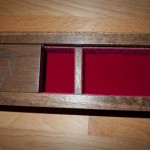
- Jewelry Box by modgrain Inside
-
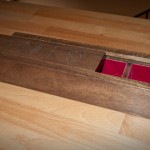
- Jewelry Box by modgrain Detail
-
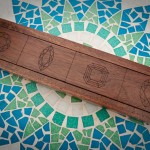
- Jewelry box laser engraving detail
 Follow modgrain on Twitter
 Become a Fan
 RSS
RSS
modgrain Said,
May 11, 2010 @ 4:33 am
This project was a great experiment. And, it was a great gift! The contemporary look that I originally intended was sacrificed once the dark stain was applied. For the next version, I’m planning to use a clear topcoat or wax so that the walnut and laser engraving really stand out. I’ll be experimenting with alternate woods too. If you are interested in a product like this, I’ll be working up more prototypes and always appreciate your feedback. Thanks.
Dave Said,
May 13, 2010 @ 11:38 pm
This is a nice piece. The combo of laser engraving with traditional woodworking came off nicely. Love the sketches and process, keep posting. What’s next?
“Joule” Jewelry Box Concept Said,
September 6, 2010 @ 9:32 pm
[…] found myself working out a new jewelry box design. The construction will be the same as my previous jewelry box design… but with the a potential new flare. I’m thinking (in addition to laser […]